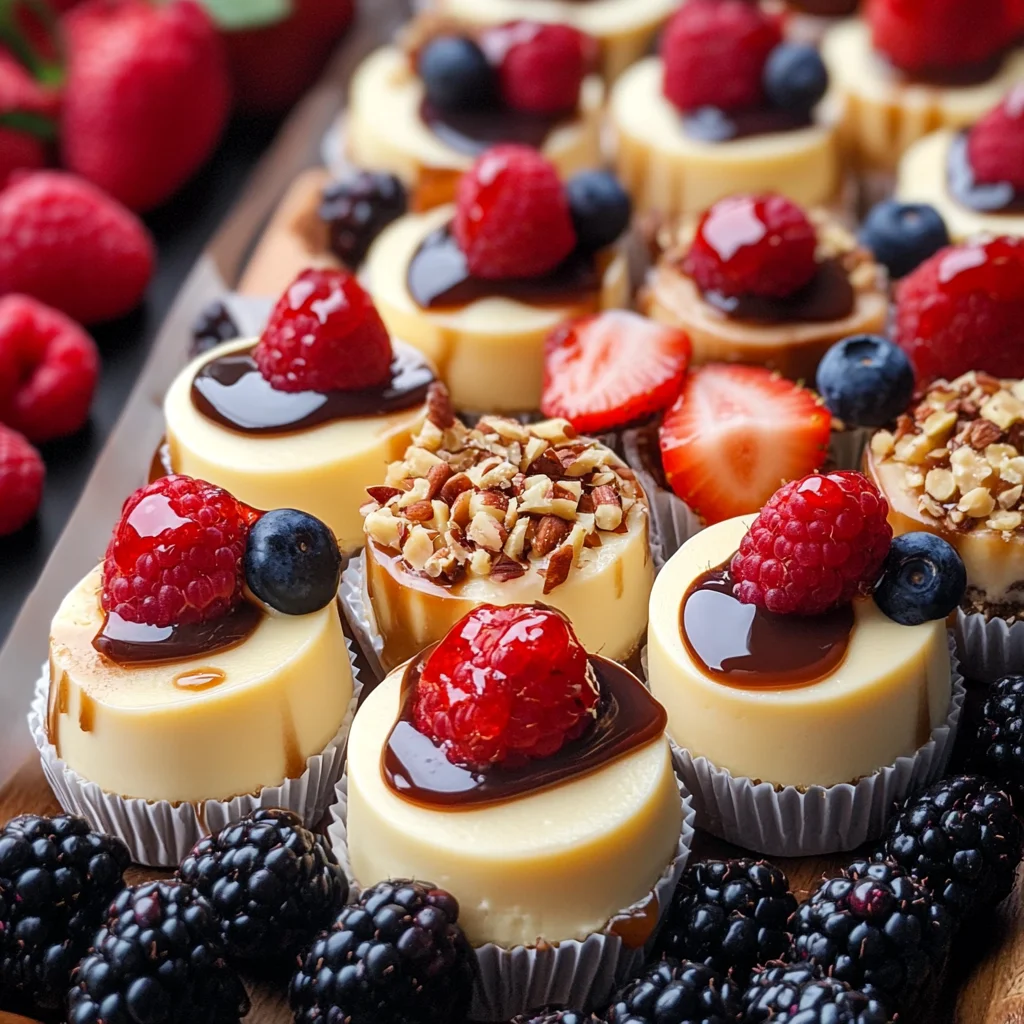
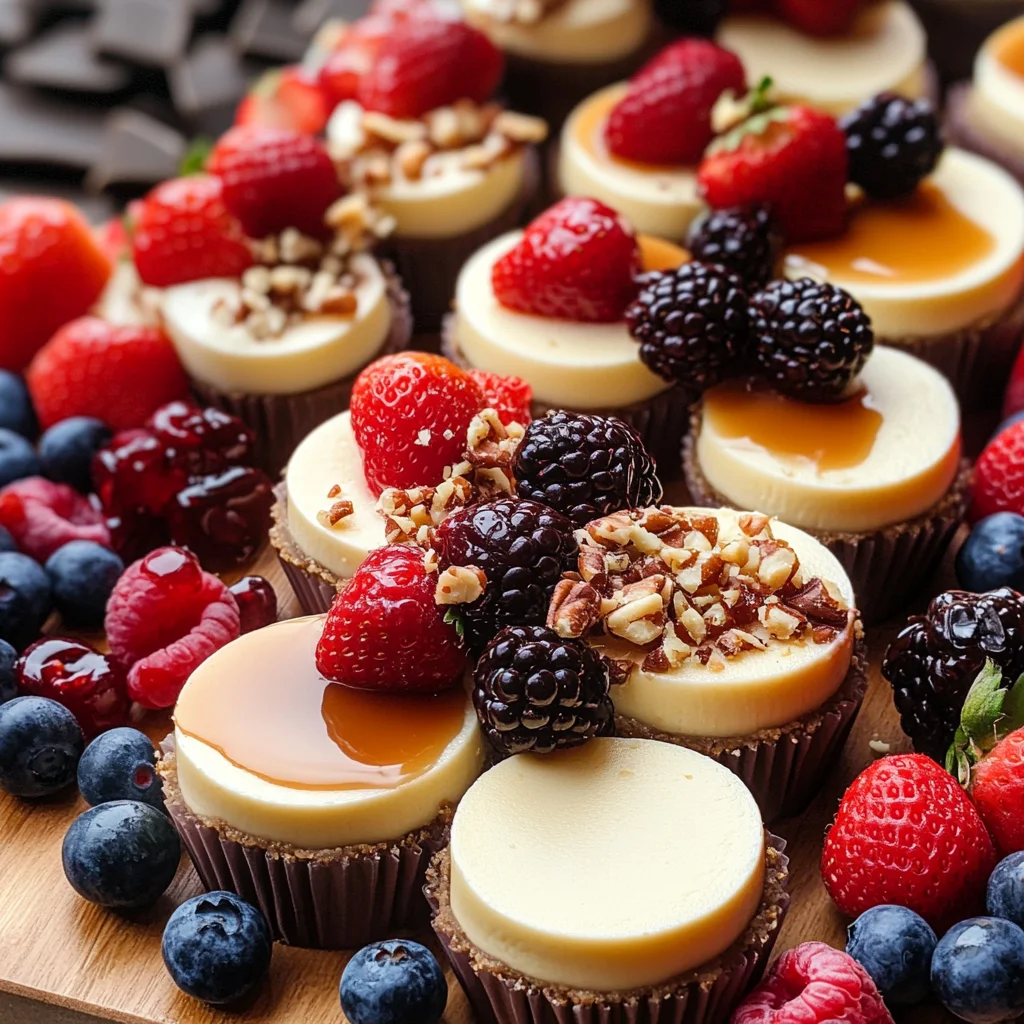
How To Make An Epic Mini Cheesecake Board
Looking to jazz up your dessert game this year? You have to check out this epic mini cheesecake board and how to wow your guests instantly at the dessert table! If you’re anything like me, you love desserts that not only taste amazing but also look stunning. This mini cheesecake board is a showstopper and a crowd-pleaser, perfect for family gatherings, birthday parties, or just a cozy night in. Trust me; once you see how easy it is to put together, you’ll want to make it for every occasion!
The best part about this recipe is its versatility. Each guest can create their own little masterpiece with an array of toppings. Plus, who doesn’t love individual-sized desserts? They are just so cute! So let’s dive into how to make an epic mini cheesecake board that will leave everyone craving more.
Why You’ll Love This Recipe
- Easy Preparation: The simple steps make it a breeze, even for beginner bakers.
- Family-Friendly Fun: Kids and adults alike will enjoy assembling their own cheesecakes!
- Make-Ahead Delight: You can prepare the cheesecakes in advance, saving you time on the big day.
- Customizable Toppings: Everyone can personalize their dessert with various toppings—how fun is that?
- Deliciously Decadent: The creamy cheesecakes paired with fresh fruits and sauces are simply irresistible.
Ingredients You’ll Need
This recipe uses simple, wholesome ingredients that you probably already have in your pantry. Let’s gather everything so we can start baking those delightful mini cheesecakes!
For the Crust
- 1 1/2 cup Graham Cracker Crumbs
- 1/4 cup Granulated Sugar
- 1/3 cup Unsalted Butter (melted)
For the Cheesecake Filling
- (2) 8 oz Packaged Cream Cheese (softened)
- 2 large Eggs
- 1 tsp Vanilla Extract
- 1/4 cup Sour Cream
For Toppings
- Fresh Berries (Strawberries, Blueberries, Raspberries)
- Chocolate Chips
- Caramel Sauce
- Chocolate Sauce
- Whipped Cream
- Crushed Nuts
Variations
One of the best things about this recipe is its flexibility! Feel free to mix things up based on your preferences or what you have on hand.
- Change the Crust: Use crushed cookies like Oreos or vanilla wafers instead of graham crackers for a different flavor.
- Add Flavorings: Try mixing in lemon zest or cocoa powder into the cheesecake filling for an extra kick.
- Go Nutty: Top with different nuts like almonds or pecans for added crunch and flavor.
- Swap the Fruits: Use seasonal fruits like peaches or cherries instead of berries for variety.
How To Make An Epic Mini Cheesecake Board
Step 1: Preheat Your Oven
Start by preheating your oven to 325°F (160°C). This step is crucial because it ensures that your mini cheesecakes bake evenly. While that’s happening, line your mini muffin tin with paper liners—this makes removing the cheesecakes a breeze!
Step 2: Prepare the Crust
In a medium mixing bowl, combine the graham cracker crumbs, 1/4 cup granulated sugar, and melted butter. Stir until the mixture resembles wet sand. This crust provides a delicious base for our cheesecakes and adds that classic flavor we all love.
Step 3: Fill the Muffin Liners
Spoon about a tablespoon of the crumb mixture into each muffin liner. Use the back of a spoon or a small cup to press down firmly. This creates a sturdy crust that holds up well when filled with cheesecake batter.
Step 4: Make the Cheesecake Filling
In a large mixing bowl, beat together the softened cream cheese and 1/2 cup granulated sugar until smooth and creamy. This step is essential because it ensures there are no lumps in your filling, resulting in silky-smooth cheesecakes!
Step 5: Add Eggs and Flavorings
Add each egg one at a time to the cream cheese mixture, beating well after each addition. Then mix in the vanilla extract and sour cream until fully combined. This blend of ingredients gives our cheesecake its rich texture and delicious flavor.
Step 6: Fill Muffin Liners with Cheesecake Mixture
Carefully spoon the cheesecake mixture evenly over each prepared crust in the muffin tin. Fill almost to the top but leave just a little space since they’ll puff up while baking.
Step 7: Bake
Bake those adorable mini cheesecakes in your preheated oven for about 15-18 minutes. You’re looking for edges that are set while keeping those centers slightly jiggly—this helps them maintain that creamy texture!
Step 8: Cool Down
Once baked, let them cool in the muffin tin for about 10 minutes before transferring them to a wire rack to cool completely. Cooling them properly helps set their shape better when serving.
Step 9: Arrange on Your Board
After they’ve cooled down completely, arrange these lovely mini cheesecakes on a serving board or platter. Presentation matters; it’s all about making it look inviting!
Step 10: Prepare Your Toppings
Get ready by washing and drying those fresh berries, melting some chocolate chips, and warming up caramel sauce. These toppings will take your mini cheesecakes from delicious to extraordinary!
Step 11: Create Your Dessert Station
Arrange all those delightful toppings around your mini cheesecakes on the board. Leave some space so guests can easily assemble their own creations without feeling cramped.
Step 12: Serve & Enjoy!
Finally, serve your epic mini cheesecake board alongside small serving spoons or forks. Let everyone dig in and top their cheesecakes as they please! Watching everyone customize their desserts adds even more joy to this delicious treat.
Now you’re ready to impress friends and family with this delightful dessert! Happy baking!
Pro Tips for Making How To Make An Epic Mini Cheesecake Board
Creating a stunning mini cheesecake board is easier than you think! Here are some pro tips to ensure your dessert dazzles every guest.
-
Choose Quality Ingredients: The cream cheese and toppings can make or break your cheesecakes. Opt for high-quality cream cheese for a rich and creamy texture, and fresh fruits for vibrant flavors.
-
Cool Completely: Allow the mini cheesecakes to cool completely before arranging them on the board. This prevents melting and ensures they hold their shape beautifully when served.
-
Mix Up Your Toppings: Variety is key! Offering different toppings like berries, chocolate chips, and crushed nuts not only adds flavor but also makes the board visually appealing.
-
Personalize Each Serving: Encourage guests to get creative by mixing their favorite toppings. This interactive approach makes dessert fun and allows everyone to enjoy their customized treat.
-
Keep it Colorful: Use a mix of colorful berries and sauces to make your board pop. This not only draws attention but also makes the whole experience more inviting.
How to Serve How To Make An Epic Mini Cheesecake Board
Presenting your mini cheesecake board can elevate the entire dessert experience! Here are some ideas on how to serve this delightful creation.
Garnishes
- Mint Leaves: Fresh mint leaves add a burst of color and a touch of freshness that enhances the overall flavor profile.
- Edible Flowers: These beautiful blooms can add elegance to your board, making it visually stunning while adding an unexpected twist in flavor.
- Chocolate Shavings: Sprinkle chocolate shavings over the top for an extra touch of indulgence that chocolate lovers will appreciate.
Side Dishes
- Fruit Salad: A refreshing medley of seasonal fruits provides a light counterbalance to the rich cheesecakes, making it perfect for cleansing the palate.
- Coffee or Tea: Offering a warm beverage such as coffee or herbal tea allows guests to sip slowly while enjoying their desserts, creating a cozy atmosphere.
- Cheese Platter: A selection of mild cheeses pairs beautifully with sweet desserts, offering contrasting flavors that enhance both the cheesecakes and cheese.
- Savory Crackers: Lightly seasoned crackers provide a crunchy contrast that complements the creaminess of the cheesecakes, making each bite unique.
By following these tips and serving suggestions, you can create an epic mini cheesecake board that’s sure to impress at any gathering! Happy baking!
Make Ahead and Storage
This mini cheesecake board is a fantastic option for meal prep! You can make the mini cheesecakes ahead of time, allowing you to relax and enjoy your gathering without stressing about dessert.
Storing Leftovers
- Store any leftover mini cheesecakes in an airtight container in the refrigerator.
- They can be kept for up to 3-4 days.
- If stored with toppings, separate them to maintain freshness and texture.
Freezing
- To freeze, place the cooled mini cheesecakes in a single layer on a baking sheet and freeze until solid.
- Wrap each cheesecake individually in plastic wrap, then place them in a freezer-safe container or bag.
- They can be frozen for up to 2 months.
Reheating
- For best results, thaw the frozen mini cheesecakes in the refrigerator overnight before serving.
- If desired, you can warm them slightly in the microwave for about 10-15 seconds on low power to enhance their creaminess.
FAQs
Here are some common questions about making your own mini cheesecake board:
How To Make An Epic Mini Cheesecake Board without using pork?
You can easily create this delightful cheesecake board without any pork products. Simply follow the recipe as it is—everything from the crust to the toppings is free from pork ingredients. Feel free to customize with your favorite toppings!
What can I use instead of animal-derived gelatin in my cheesecake?
In this recipe, we don’t use gelatin at all. The cream cheese provides enough structure when baked. If you’re looking for alternatives for other recipes needing gelatin, consider agar-agar or pectin as plant-based substitutes.
Can I use different fruits on my cheesecake board?
Absolutely! Feel free to mix and match with your favorite fruits. Berries like strawberries, blueberries, and raspberries are perfect, but you can also use sliced bananas or even tropical fruits like mangoes for a unique twist.
How To Make An Epic Mini Cheesecake Board suitable for gatherings?
This mini cheesecake board is not only visually appealing but also interactive! Guests love personalizing their desserts with various toppings. It’s perfect for parties where everyone can indulge in their own creations.
What if I want to make these mini cheesecakes gluten-free?
To make this recipe gluten-free, simply substitute standard graham cracker crumbs with gluten-free graham cracker crumbs or crushed gluten-free cookies. The rest of the ingredients are naturally gluten-free!
Final Thoughts
I hope you’re as excited as I am about making this epic mini cheesecake board! It’s such a fun way to serve dessert while letting everyone customize their treats just how they like them. Enjoy every moment spent creating these little delights, and don’t forget to share your experience! Happy baking!
How To Make An Epic Mini Cheesecake Board

Elevate your dessert game with this delightful mini cheesecake board! Perfect for any gathering, these individual cheesecakes are not only delicious but also visually stunning. Guests can customize their desserts with a variety of toppings, making each mini cheesecake a personal masterpiece. With an easy preparation process and flexible ingredient options, you’ll impress everyone at the table.
- Prep Time: 20 minutes
- Cook Time: 18 minutes
- Total Time: 38 minutes
- Yield: Approximately 12 servings 1x
- Category: Dessert
- Method: Baking
- Cuisine: American
Ingredients
- 1 1/2 cup Graham Cracker Crumbs
- 1/4 cup Granulated Sugar
- 1/3 cup Unsalted Butter (melted)
- 2 (8 oz) Packaged Cream Cheese (softened)
- 2 large Eggs
- 1 tsp Vanilla Extract
- 1/4 cup Sour Cream
- Fresh Berries
- Chocolate Chips
- Caramel Sauce
- Chocolate Sauce
- Whipped Cream
- Crushed Nuts
Instructions
- Preheat your oven to 325°F (160°C) and line a mini muffin tin with paper liners.
- In a bowl, mix graham cracker crumbs, sugar, and melted butter until it resembles wet sand. Press about a tablespoon into each liner to form the crust.
- Beat together cream cheese and sugar in another bowl until smooth. Add eggs one at a time, then mix in vanilla and sour cream.
- Spoon the cheesecake mixture over the crusts in the muffin tins.
- Bake for 15-18 minutes until edges are set but centers are slightly jiggly.
- Cool in the tin for 10 minutes before transferring to a wire rack.
- Arrange on a serving board with toppings for guests to customize.
Nutrition
- Serving Size: 1 mini cheesecake (40g)
- Calories: 130
- Sugar: 9g
- Sodium: 85mg
- Fat: 9g
- Saturated Fat: 5g
- Unsaturated Fat: 3g
- Trans Fat: 0g
- Carbohydrates: 11g
- Fiber: <1g
- Protein: 2g
- Cholesterol: 35mg