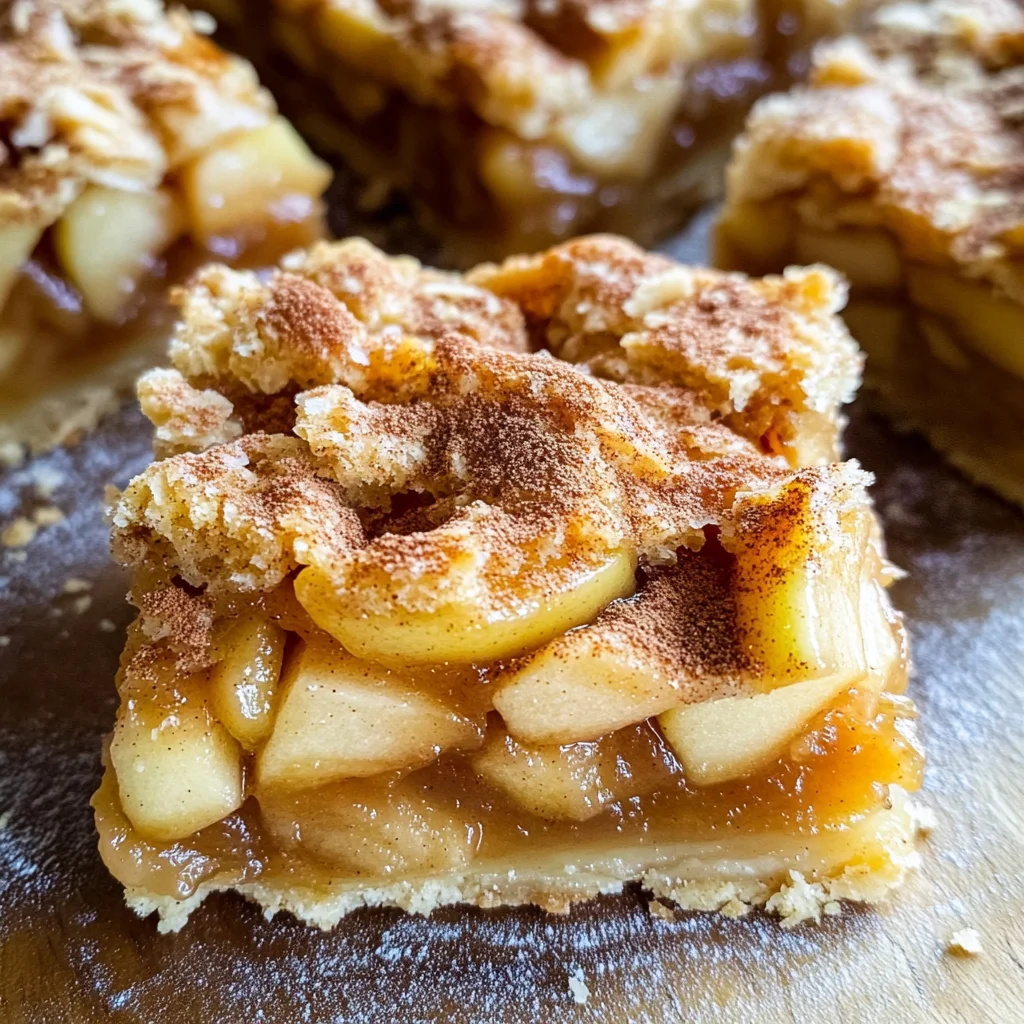
How to Make the Best Apple Pie Bars
If you’re looking for a delightful dessert that warms the heart and fills the home with sweet aromas, then you’ve come to the right place! Today, I’m excited to share my beloved recipe on how to make the best apple pie bars. These bars are a wonderful blend of tender apples and a buttery crust, making them perfect for any occasion—whether it’s a busy weeknight or a family gathering. Trust me, once you try these, they’ll quickly become a favorite in your household!
What I love most about this recipe is how it captures the essence of classic apple pie but in a fun and easy-to-eat bar form. Plus, they make fantastic leftovers (if there are any!). Grab your apron, and let’s dive into this delicious adventure together!
Why You’ll Love This Recipe
- Easy to Make: With simple steps and straightforward ingredients, you can whip these up in no time!
- Family-Friendly: Everyone loves apple pie! These bars are perfect for kids and adults alike.
- Make-Ahead Convenience: Bake them in advance; they store well and taste delightful even after a day or two.
- Delicious Flavor: The combination of cinnamon-spiced apples with a crumbly topping makes every bite heavenly.
Ingredients You’ll Need
Gathering your ingredients is part of the fun! For this recipe, we’re using simple, wholesome items that you probably already have at home. Here’s what you’ll need:
For the Crust
- 1 cup all-purpose flour
- 1/2 cup rolled oats
- 1/4 cup brown sugar
- 1/4 cup softened coconut oil
- 1/4 teaspoon salt
For the Apple Filling
- 3 medium apples, peeled and diced
- 1 tablespoon lemon juice
- 1/2 teaspoon cinnamon
- 1/4 cup maple syrup (or honey)
- 2 tablespoons cornstarch
For the Topping
- 1/2 cup all-purpose flour
- 1/2 cup rolled oats
- 1/4 cup brown sugar
- 3 tablespoons softened coconut oil
Variations
One of the best things about apple pie bars is their flexibility! You can easily customize them to suit your tastes or what you have on hand.
- Add Nuts: Toss in some chopped walnuts or pecans for added crunch and flavor.
- Mix in Berries: Combine apples with fresh or frozen berries for a fruity twist.
- Spice it Up: Experiment with spices like nutmeg or ginger for an extra kick.
- Use Different Sweeteners: Feel free to swap maple syrup with agave nectar or another sweetener of your choice.
How to Make How to Make the Best Apple Pie Bars
Step 1: Prepare the Crust
Start by preheating your oven to 350°F (175°C). In a mixing bowl, combine the flour, oats, brown sugar, softened coconut oil, and salt. Mix until crumbly. Press this mixture into the bottom of an 8×8 inch baking dish. This creates a wonderful base that’s both sturdy and delicious!
Step 2: Make the Apple Filling
In another bowl, toss the diced apples with lemon juice, cinnamon, maple syrup, and cornstarch. This mixture not only adds sweetness but also helps thicken up as it bakes. Spread this filling evenly over your crust. It’s important to distribute it well so every bite gets that lovely apple goodness!
Step 3: Prepare the Topping
Now it’s time for the topping! In a clean bowl, combine flour, oats, brown sugar, and softened coconut oil until crumbly again. Sprinkle this over your apple filling generously. This topping will bake into a golden crust that contrasts beautifully with the tender apples beneath.
Step 4: Bake Your Bars
Place your baking dish in the oven and let it bake for about 40 minutes until golden brown on top. The aroma will fill your kitchen with warmth and comfort—it’s truly irresistible! Once baked, allow your bars to cool before slicing into squares.
And there you have it—how to make the best apple pie bars! Enjoy these sweet treats warm or chilled; either way, they’re sure to be a hit!
Pro Tips for Making How to Make the Best Apple Pie Bars
Making apple pie bars can be a delightful experience, and with a few tips, you can elevate your baking game.
-
Choose the right apples: Opt for a mix of sweet and tart apples like Granny Smith and Honeycrisp. This combination brings out the best flavor in your bars.
-
Chill the dough: After mixing your crust ingredients, chill the dough for at least 30 minutes. This helps the butter solidify, resulting in a flaky texture.
-
Don’t skimp on spices: A good dash of cinnamon and nutmeg enhances the apple flavor beautifully. These warm spices are what make your bars taste like a cozy fall day.
-
Let them cool before slicing: Allow your apple pie bars to cool completely in the pan before cutting. This helps them hold their shape and makes serving easier.
-
Store properly: To keep your bars fresh, store them in an airtight container at room temperature for up to three days or refrigerate for up to a week. They also freeze well if you want to save some for later!
How to Serve How to Make the Best Apple Pie Bars
Serving apple pie bars is all about presentation and pairing them with complementary flavors. Here are some ideas to make your dessert shine.
Garnishes
- Whipped Coconut Cream: A dollop of whipped coconut cream adds a creamy texture that pairs wonderfully with the warm apple filling.
- Caramel Sauce: Drizzling homemade or store-bought caramel sauce over the top adds an indulgent touch that elevates each bite.
- Chopped Nuts: Sprinkle some toasted walnuts or pecans on top for a delightful crunch and added flavor contrast.
Side Dishes
- Vanilla Ice Cream: A scoop of vanilla ice cream melts beautifully over warm apple pie bars, creating a comforting contrast of temperatures.
- Spiced Chai Tea: Serve these bars with a cup of spiced chai tea for a cozy, aromatic pairing that complements the flavors perfectly.
- Fresh Fruit Salad: A refreshing fruit salad made with seasonal fruits balances the richness of the apple pie bars while adding a pop of color.
- Cinnamon Sugar Tortilla Chips: Crispy tortilla chips dusted with cinnamon sugar make for a fun and crunchy side that echoes the flavors of your dessert!
Enjoy creating this delicious treat; they’re perfect for any occasion—whether it’s a family gathering or just a cozy night in! Happy baking!

Make Ahead and Storage
These Apple Pie Bars are not just delicious; they’re also perfect for meal prep! You can easily make them ahead of time, store them, and enjoy them throughout the week. Here’s how to keep your sweet treats fresh.
Storing Leftovers
- Allow the bars to cool completely before storing.
- Place them in an airtight container.
- Store at room temperature for up to 3 days or refrigerate for up to a week.
Freezing
- Cut the bars into squares before freezing for easy serving.
- Wrap each bar tightly in plastic wrap and then place them in a freezer-safe bag or container.
- They can be frozen for up to 3 months.
Reheating
- To reheat, thaw the bars overnight in the refrigerator.
- Warm them in a microwave for about 10-15 seconds or in an oven preheated to 350°F (175°C) for about 5-10 minutes until heated through.
FAQs
Here are some common questions about making these delightful apple pie bars!
How to Make the Best Apple Pie Bars with different apples?
You can use a variety of apples like Granny Smith, Honeycrisp, or Fuji. Each type will bring its unique flavor and sweetness, so feel free to mix and match!
Can I make the best apple pie bars without gluten?
Absolutely! Substitute all-purpose flour with a gluten-free blend that includes xanthan gum for the best results.
What is the secret to making the best apple pie bars?
The secret lies in using fresh apples and balancing sweetness with spices like cinnamon and nutmeg. Don’t forget to let your dough chill before rolling it out!
How long do these apple pie bars last?
When stored properly, they last up to 3 days at room temperature or up to a week in the fridge. If you freeze them, they can last up to 3 months.
Final Thoughts
I hope you find joy in making these delicious Apple Pie Bars! They embody comfort food at its finest and are sure to bring warmth and happiness to your kitchen. Enjoy sharing this recipe with friends and family—they’ll appreciate your effort! Happy baking!
How to Make the Best Apple Pie Bars
If you’re in search of a heartwarming dessert that fills your home with delightful aromas, look no further than these delicious apple pie bars! This easy-to-follow recipe captures the classic flavors of traditional apple pie in a portable bar form, making it perfect for busy weeknights or festive gatherings. With tender apples spiced with cinnamon and a crumbly topping, each bite is truly heavenly. These bars are not only scrumptious fresh out of the oven but also make great leftovers, ensuring you can enjoy them throughout the week. Let’s dive into how to make the best apple pie bars that will quickly become a favorite in your household!
- Prep Time: 15 minutes
- Cook Time: 40 minutes
- Total Time: 55 minutes
- Yield: Serves approximately 16 squares 1x
- Category: Dessert
- Method: Baking
- Cuisine: American
Ingredients
- 1 cup all-purpose flour
- 1/2 cup rolled oats
- 1/4 cup brown sugar
- 1/4 cup softened coconut oil
- 1/4 teaspoon salt
- 3 medium apples, peeled and diced
- 1 tablespoon lemon juice
- 1/2 teaspoon cinnamon
- 1/4 cup maple syrup (or honey)
- 2 tablespoons cornstarch
Instructions
- Preheat your oven to 350°F (175°C). In a mixing bowl, combine flour, oats, brown sugar, softened coconut oil, and salt until crumbly. Press this mixture into an 8×8 inch baking dish.
- In a separate bowl, mix diced apples with lemon juice, cinnamon, maple syrup, and cornstarch. Spread this filling evenly over the crust.
- For the topping, combine flour, oats, brown sugar, and softened coconut oil until crumbly. Sprinkle over the apple filling.
- Bake for about 40 minutes until golden brown on top. Allow to cool before slicing.
Nutrition
- Serving Size: 1 square (45g)
- Calories: 150
- Sugar: 10g
- Sodium: 45mg
- Fat: 7g
- Saturated Fat: 5g
- Unsaturated Fat: 2g
- Trans Fat: 0g
- Carbohydrates: 19g
- Fiber: 2g
- Protein: 2g
- Cholesterol: 0mg